FIELD TESTS / MAASTOKOKEITA
UNFIELD TESTS /EPÄMAASTOKOKEITA
Mitä näenkään infrapunassa EOS 20D:lla? / What do I see in IR with a EOS 20D?
July 2005
(c) Harry Lehto for the text and photographs(English text follows the Finnish one)
JOHDANTO JA KOKEEN ASETTELU
Tämän kokeen tarkoituksena oli ymmärtää1) Mikä aiheuttaa signaalin vihreässä ja sinisessä kaistassa kun kuvataan yhdistelmällä Canon EOS 20D ja lähi-infrapunan B+W092 suodatin. Ovatko B ja G siis herkkiä infrapunassa vai tuleeko infrapunasuotimen läpi jotain lyhytaaltoisempaa säteilyä varsinaisilta B ja G kaistoilta.
2) Minkälainen herkkyys yhdistelmällä on 700 ja 750 nanometrin välillä.
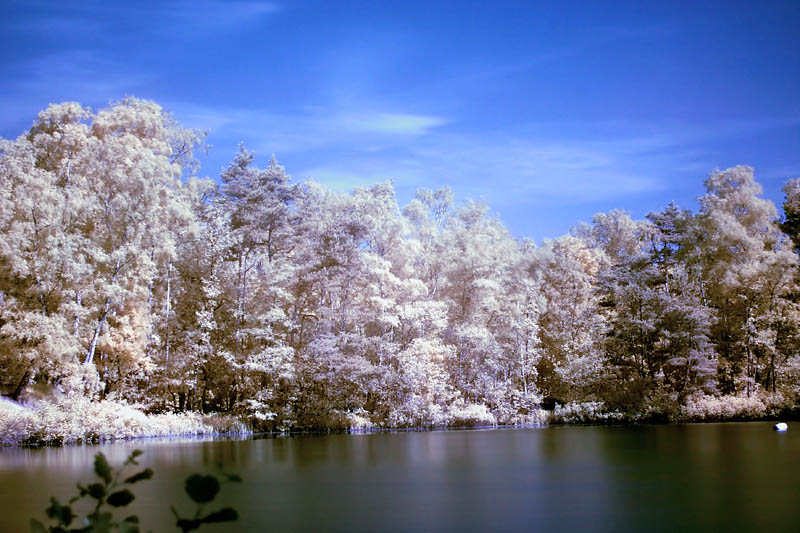
Pari väärävärikuvaa IR:llä laitteistollani Puita ja lampea sekä puita ja rakennus . Aitoja IR värejä ei voi esittää näkyvän valon kuvassa, joten näissä kuvissa on otettu vapaus vaihtaa punaisen ja sinisen kaistan signaalit keskenään.
Verkkoa tonkimalla voi löytää jotain vastauksia seka EOS 20D:n herkkyydestä
kuin myös B+W092 suotimen läpäisystä. Vastausta edellämainittuihin kysymyksiin
ne eivät kuitenkaan anna.
Tarvikkeet:
Canon 20D
Canon EF 50mm, f2.5
Lähi-infrapunasuodatin B+W092
CD (tai DVD) käyttämättömiä
Valolähteenä diaprojektorin halogeeni, ja toisena pienoisloisteputki (CFL, 2700K).
Koe etenee siten että luodaan spektri käyttäen CDta heijastushilana. Valokuvataan näin aikaansaatu spektri. Tämä tehdään sekä ilman suodatinta että suodattimen kanssa. Likimääräinen aallonpituuskalibrointi tehdään pienoisloisteputkella.
Koejärjestely on seuraavanlainen: istu pimeässä huoneessa. Projektori on
noin selkäsi ja näyttää suunnilleen kohti selkääsi. Projektorin edessä on pahvi jossa on
kapea pystysuora rako (millin leveä ja kymmenen korkea). Vasemmalla puolen
metrin päässä sinusta on CD, jonka pystyakselin varassa kiertämällä saat
spektrin näkyviin. Kamera on kohtisuorassa CD:hen nähden. Voit käyttää
myös DVDta, mutta silloin näet vain osan näkyvästä spektristä. CD:n asennon
voit säätää siten, että kameran läpi katsottuna se näyttää mahdollisimman
terävälle. CD kotelo on hyvä teline CD:lle. Projektorin raon, CD:n
keskikohdan ja kameran optisen akselin on hyvä olla samassa tasossa.
Aallonpituuskalibroinnin voi suorittaa ottamalla spektrin loisteputkesta ja
sovittamalla värit jatkuvan spektrin väreihin. CD:lla sain spektrin skaalaksi
noin 4pikseliä/nm. Spektrin erotuskyky on 10nm:n luokkaa, ja spektri ei
ole aivan lineaarinen (joten max noin 20 nm arvioitu virhe).
Kuvat ja kuvatekstit englanninkielisen johdannon alapuolella.
INTRODUCTION AND EXPERIMENT SETUP
The aim of this experiment was to understand1) What causes the signal in the B and G channels when photographs are taken with the combination of Canon EOS 20D and near infrared filter B+W092
2) Is there any light between 720nm and 750nm with the combination 20D and B+W092?
A couple of false color images in IR with my setup: Trees and a lake and Trees and a building . Genuine IR colors cannot be represented in visual light, so in these picture I have taken the liberty to switch the signals from the blue and red channels.
Some suggestions can be drawn by combining information in the net for
both 20D and B+W092 transmissions, but these don't quite answer
the questions above.
Note that this experiment is not scientific, nor is it accurately calibrated,
but still is able to answer the questions above and is relatively easy to
do at home.
Supplies:
Canon 20D
Canon EF 50mm, f2.5
Near infrared filter B+W092
CD (or DVD), unused
Light sources: a slide projector halogen and a compact flourescent light bulb(CFL, 2700K).
The idea of the experiment is to create a spectrum by using a CD as a reflecting grating. This spectrum is then photographed. With the identical construction a spectrum is taken with the filter attached. An approximate wavelength calibration is obtained with a compact flourescent light bulb
The setup is as follows: Sit in a dark room. Have the slide projector point
towards your back. Put in front of the projector a narrow slit (hole 1 mm
wide and 1 cm high). About a meter from you, a bit to your left place an unused
CD, keep it vertically and turn it until you see the full spectrum from
blue to red on your CD. You can also use a DVD, but then you will see only
a part of the spectrum. The CD case is a good stand for the CD.
Point your camera on the CD and focus on the spectrum. The slit,
the center of the CD and the optical axis of the lens should
be on the same plane.
An approximate wavelength calibration is possible by measuring the spectrum
of an household compact fluorescent light bulb, and by matching the colors
of the knownlines to the colors of the continuum spectrum of the halogen
light bulb.
The wavelength scale of the spectrum I obtained was 4 pixels/nm, and the
and the spectral resolution is about 10nm. The spectrum is not comletely linear
(estimated wavelength accuracy 20nm).
Kuvat /Pictures
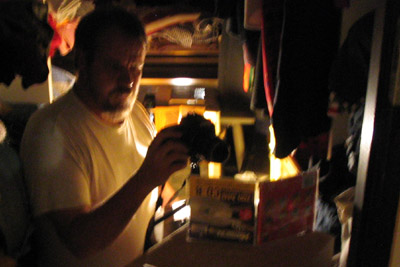
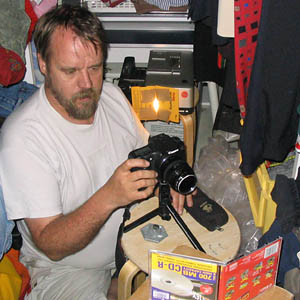
Pimeän huoneen kuvajärjestely. Huomaa projektorin, raon, cdn ja kameran sijainnit.
The setup in a dark room is shown. Note relative positions of the projector, the slit, the cd and the camera.

Halogeenivalon spektri 20D:n läpi
Plain spectrum of the halogen light with a 20D

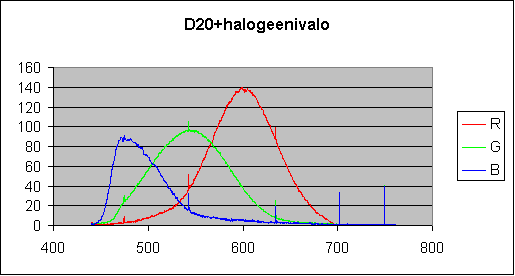
Halogeenivalon spektri 20D ja B+W092:n läpi
Spectrum of the halogen light + 20D and the B+W 092 filter

Pienoisloisteputkilampun spektri. Voimakkaimmat viivat ovat vihreän Hg 546nm ja punaisen fosforin 611nm viiva. Kalibroinnissa on kaytetty lisaksi heikkoa sinista (fosforin?) viivaa 486nm kohdalla.
Spectrum of the fluorescent light bulb. The strongest lines are the green mercury line at 546nm, and the red phosphorus line at 611nm. The weak blue line at 486 nm (phosphorus?) has also been used for wavelength calibration.
Halogeenivalon spektri 20D:n läpi
Pienet pystypiikkit osoittavat aallonpituuksia 486, 546, 611, 700 ja 750nm Huomaa, että halogeenin spektristä johtuva spektrin katkaisu 450 nm:n kohdalla
Plain spectrum of the halogen light with a 20D
The small vertical spikes denote the wavelengths 486, 546, 611, 700 and 750 nm.
Note the sharp spectral cutoff at 450nm, which is due to the cutoff in the halogen spectrum.
Specs: ISO=800, 1/1000sec, f=2.5 (255/40) , relative scale =1
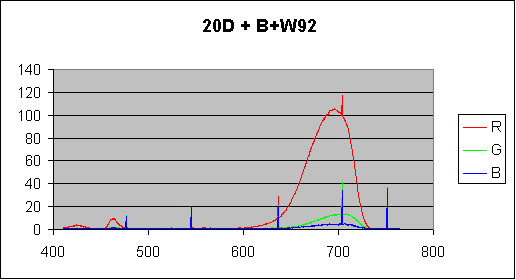
Halogeenivalon spektri 20D ja B+W092:n läpi. Valotusaika paljon pidempi. Jos halutaan verrata edelliseen kuvaan tulee kuvan kirkkaus luvut (y akseli) jakaa luvulla 17000.
Spectrum of the halogen light + 20D and the B+W 092 filter
Specs: ISO=800, 30sec, f=2.5, (255/70), relative scale = 30000*40/70= 17000.
One should divide with this number if one wants to compare this plot
to the previous one.
TULOKSET:
1. Infrapunassa sinisissä ja vihreissä pikseleissä näkyvä signaali johtuu näiden pikselien herkkyydestä lähi-infrapunassa. Sinisestä tai vihreästä ei tule mitattavaa signaalia.2. Yhdistetty kameran ja suotimen huippu näyttää olevan 700 nm paikkeilla, laskien hyvin nopeasti 730nm:iin. Tähän tarvitaan tarkempi spektrin aallonpituuskaalan kalibrointi.
RESULTS:
1. The signal present in the B and G channels in photographs taken though the IR channel is because of the IR sensitivity of those pixels, and not because the B+W filter has significant residual sensitivity in the actual B or G bands.2. The sensitivity maximum of the combined 20D and B+W 092 filter has a maximum near 700nm, and fall off rapidly to 730nm. However, here one has to remember the 20nm or so ambiguity in the wavelength calibration.
LINKKEJÄ / LINKS
Simplified spectra of lamps http://members.misty.com/don/spectra.html ,Transmission of B+W 092 and other filters http://msp.rmit.edu.au/Article_03/02c.html
Transmission of Canon 10D http://www.astrosurf.org/buil/d70v10d/eval.htm